SUBMIT WEDDING
View Posts By:

categories


tags

 
DIY Chocolate Wax Seals

As a follow-up to the super cute Galentine’s party, we wanted to share a yummy DIY perfect for sealing those Valentine’s treats and gifts. These Gold Chocolate Wax Seals crafted by Lauryn Prattes Styling And Events with the prettiest custom seals from Laura Hooper are a welcome addition to any pastry. And edible gold? Count us in! For the full party gallery photographed by Abby Jiu, click here.

Materials

Wax Seal
1 cup of Chocolate Chips
Parchment Paper
Gold Luster Dust

instructions

step-1
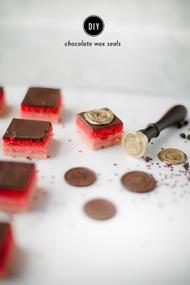
Using a double boiler (or large pot and a metal bowl) place water in the bottom pot so it is just 1/2 inch below the top pan. Place 1 cup of chocolate chips in the top pan and place over low-medium heat. Stir constantly until chocolate chips melt. Water should not come to a boil. Remove from heat and let cool about 3 minutes.

step-2 Place wax stamper on ice in a small glass to allow it to get cold. Use a small spoon to place dime size dollop of chocolate onto a sheet of parchment paper. Remove the cold wax stamper from the ice, wipe dry and stamp down onto the chocolate, press down so the chocolate oozes around the side, forming the “seal” look. Leave the stamper in place for 3-5 seconds to allow chocolate to cool and remove. Repeat, placing the stamper on ice between seals.

step-3 Use gold luster dust to paint seals gold if desired. Place in refrigerator to chill prior to using. To adhere to pastry simply use a small dollop of melted chocolate or honey.

[dotted]

Photography: Abby Jiu Photography | Event Design: Lauryn Prattes Styling And Events | Wax Seal : Laura Hooper Calligraphy | Desserts: Buttercream Bakeshop | Venue: Winifred Paper

Romantic Estate Inspiration Every Princess Bride Will Fawn Over

An estate fit for a princess, an enchanted garden, a lace dress and flower magic from Hanaki Floral Design – this stunning styled shoot from Jacqueline Rae Weddings is nothing short of a fairytale. It perfectly combines traditional elegance with romantic details, leaving no detail left unturned. Head on over to the full gallery captured beautifully by Kristyn Harder Photography to get seriously inspired for your big day.

From the Photographer… Built in 1911, Hycroft Manor is a breathtaking mansion that was once the center of Vancouver’s social scene. It was known for its parties, which were attended by the city’s elite. In addition to its rich history, the buildings architecture and surrounding gardens are a sight to be seen. This is truly a magical place, which is why it’s still a sought-after venue for weddings and events today. As a wedding photographer, I believe there are two keys to a beautiful wedding portrait. A couple whose love shines brightly, and a picturesque setting surrounding them in their bliss. Add in the stunning details such as florals, a classic car and designer wedding gowns, and even more magic is made.

This inspiration shoot at Hycroft Manor came together with the contribution of some of the best vendors Western Canada has to offer, and a crazy-in-love couple who was preparing for their own wedding day just one week later. During a trip to Vancouver, I visited Hycroft Manor and was blown away by how beautiful the mansion and the grounds were. The architecture is classic and detailed, with the view of the front and the grand back staircase stealing the show for me.

In one corner I found the Heritage garden, blooming with assorted flowers, falling vines, and adorned with sculptures. The view terrace was the perfect spot for a reception to take place, and the Juliet balcony would be ideal for couple’s portraits as the sun set. I knew I had to photograph here, and the words classic, elegant and heartfelt inspired what was to come. I met with Jacqueline Rae, a wedding planner based out of Calgary, who is inspired by French-European Design and classic details. She was the perfect person to bring my vision to life, and together we planned our trip to Vancouver a few months later.

From the Designer… Architecture plays a large role in our classic-focused designs and the Hycroft Manor provided a breathtaking aesthetic and history to build upon and complement. Combined with a curated team of valuing connection and utter-romance, our inspiration shoot came to life in the best-possible way. Emilee and Scott are two of the sweetest people we have ever had the pleasure of working with. They were so in love and looking forward to their own wedding day only a week later. We made the decision at the start to include a real couple as part of the project, since we valued real emotion, connection and joy to come through in photographs. Not only were Emilee and Scott easy to photograph because of their connection, but they made beautiful models too. Hanaki Floral Design created the most beautiful floral pieces, including the show-stopping bridal bouquet and the balcony adornment that provided the most beautiful backdrop for our bride and groom. A blend of centerpieces filled the tablescape with mercury glass compotes, added dimension and combined with delicate blooms and vines, added an organic and Ikebana approach to a classic design. Quaint place setting bouquets wrapped in cream-silk ribbon sat atop the guest menu and place cards. A custom car wreath was designed alongside a hand-calligraphed fabric banner from Debbie Wong Designs

Debbie created the most-romantic stationery and calligraphy suite including linen menus and hand-calligraphed silk-ribbon placecards that sat on top of the delicate place settings. Paper details included a hand-drawn sketch of the Hycroft venue columns on fine vellum with a calligraphy invite suite underneath. Complementing the paper goods was hand-calligraphy love notes to the couple. Stesha Ho is a talented couture dress designer based out of Vancouver who creates custom gowns for her brides. She contributed two stunning gowns incorporating only the finest European lace and silk as well as hand-sewn beading which featured intricate, feminine details. Our Menswear included a classic black tux with a shawl lapel by Black and Lee and was tailored to our tall Groom. Joanna Bisley Designs provided the exquisite bridal jewelry including a heirloom hair-pin with pearls and delicate jewels and delicate clear crystal earrings with light ivory pearl navettes in a gold setting. The tablescape and event rentals were provided by Pedersen’s Event Rentals and featured beautifully textured White Panama Linen, Bone Coupe Plates, soft Blush Napkins, and Gold Nova chairs which allowed clear sight lines through the cane-back glass. A champagne coupe tower placed on a Shant blush linen added to the classic details of the event. Our classic car provided by Ritz Limousine was a cream 1939 Cadillac Stretch Limousine with suede interiors and peekaboo back windows adding charm and elegance to sweep our couple away.

Photographer: Kristyn Harder Photography | Florist: Hanaki Floral Design | Wedding Gown: Stesha Ho | Stationery: Debbie Wong Design | Makeup and Hair: Alisha Hopps | Car Rental: Ritz Limousines | Wedding Venue: Hycroft Manor | Accessories: Joanna Bisley Designs | Menswear: Black & Lee | Planning: Jacqueline Rae Weddings | Rentals: Pedersen's rentals | Veil: Sara Gabriel

DIY Paper Covered Boxes for Storing or Gifting

Whether you’re working away on presents to sneak under the Christmas tree, or looking to gussy up gift boxes for your bridesmaids and beyond, this video tutorial is one to bookmark. In just a few easy steps, you can take your gifting game to the next level with a box that certainly won’t be tossed away. Thanks to Elysium Productions for filming the step-by-step below!

[iframe https://www.youtube.com/embed/RcNXLPqHYVU 600 355]

[dotted]

Materials

Bowl
Sponge
Box
Ruler
Paint
Scissors
Spray Adhesive
Paper

instructions

step-1 Place some paint inside the bowl. Paint inside the box and lid.

step-2 Measure the box and lid. Width + 2x Height + 1 inch. Transfer measurements onto paper. Then cut a square piece for each of them.

step-3 Center the box on the paper, then fold all four sides up. Create creases at each corner. Cut slits at each four corners, stopping at the box perimeter. Spray adhesive onto the paper and place the box in the center. Cut the paper to match the shape. Spray adhesive on all four sides and fold the paper up against the box.

step-4 Repeat the same steps for the lid. Voilà!

[dotted]

Film: Elysium Productions | DIY: Style Me Pretty

[dotted]

MORE DIYS THIS WAY!

These Vendors are members of our Little Black Book.
For membership information, click here
A Galentine’s Soiree + Valentine’s Printables!

Gal + Valentine’s = Galentine’s! Clever, right? This party inspiration crafted by Lauryn Prattes Styling And EventsHolly Chapple Flowers, and Abby Jiu Photography is all about celebrating friendships this Valentine’s. Feasting on sweet treats, crafting love day notes with stationery by Winifred Paper + calligraphy by Laura Hooper and sipping bubbly sounds like a Vday spent well. Click here for more.

[dotted]

Valentine’s Day Printables

[dotted]

Cootie Catchers
Envelope Liners – Red Hearts, Be Mine, Red Dots, Red Stripes, Pink Stripes
Pop-Up Valentine Card

Host a Galentine’s Soiree for your girlfriends this year to celebrate your friendships. We designed our party around a playful and fun color palette of cherry red, blush pink, fuchsia, white and gold.

Sweet treats and desserts are not only the perfect bites for the party, but also double as Valentines Gifts. Using an edible marker you can write any message onto a macaroon shell, and package them in a pink tissue paper cracker for an extra special surprise. Another treat is a unique spin on Italian Rainbow Cookies – instead of the traditional red, green and white we made them more Valentines appropriate with pink ombre layers. Chocolate seals made using a wax stamper from Laura Hooper Calligraphy were dusted gold and “glued” to the top layer using melted chocolate. (See tutorial below)

Hand painted watercolor cookie hearts, X’s and O’s make for a Valentines surprise. We packages ours in vellum envelopes, tied with red and white twine and sealed with wax. But one of our favorite desserts was the adorable heart shaped S’mores. Why have white marshmallows when they can be pink marbled? Cut marshmallows out with heart cookie cutters and layer with white chocolate and a chocolate cookie – nothing says I Love You S’more.

The table for the party was set with acrylic trays, gold vinyl decals printed by Winifred Paper studio featuring calligraphy from Laura Hooper. The trays were then filled with all the paper, tape and crafting supplies needed for an afternoon of Valentine’s making delight. And one of our favorite Valentines is the adorable Cootie Catcher from Winifred Paper studio, package with a little crinkle paper and a pink box and it’s complete.

Pink champagne glasses and heart and arrow stir sticks made by Lauryn Prattes Styling and Events were the perfect touch for the table. Above the table we strung gold heart garland while greenery and flowers from Holly Chapple accented the chandelier. More beautiful blooms in shades of pink and red finished off the table.

Check out Laura Hooper’s Etsy shop for some of the details we used in the shoot available for purchase – like the heart coasters, cake topper and Valentine’s day prints.

Photography: Abby Jiu Photography | Event Design: Lauryn Prattes Styling and Events | Flowers: Holly Heider Chapple Flowers LTD | Stationary: Winifred Paper | Calligraphy: Laura Hooper Calligraphy | Venue: Winifred Paper | Bar Cart/Champagne Bucket/Gold Flatware/Cake Server/Cake Plate: Mintwood Home | Chalk Art/Heart Coasters/Cake Topper/S'more Bags/Art Prints/Wax : Laura Hooper Calligraphy | Desserts: Buttercream Bakeshop | Heart Garland: Pop Of Happy | Large Balloons: Stephanie Shives Studio

This Inspiration Shoot Will Make You Love Italy Even More

Italian wedding inspiration at a majestic villa in Apulia?! Yes, please! Come for the white stone architecture, and stay for the color palette highlighted by the beauty of the region. This destination wedding inspiration has us feeling the amoré! The genius of Joy Proctor Design and the desire of The Wedding Boutique Italy to produce exceptional and memorable events has come together in a harmonious collaboration that’s not to be missed. Join us in the full gallery for a closer look.


From Joy Proctor DesignWe must feel inspired in order to inspire, and when a seasoned designer and wedding planner embark on a spontaneous adventure through the tiny stone-walled roadways of Italy’s best-kept secret, its Southern region of Apulia, magical things can happen.


Discovering the beautiful gem that is Masseria Pettolecchia is like stepping through the looking glass into an other-worldly dimension where the largest, lushest vegetables you have ever seen grow proudly beneath the ancient olive trees that date back over 2000 years, stretching right out to the shores of the azure Adriatic Sea. The ceremony was set in an archway of the Pettolecchia with golden candles. Cocktails were set up in an adjacent archway with a beautiful stone bar and hand-painted bar sign.


I chose a color palette accenting the beauty of the region; the taupe from Apulia stone, the blue of the azure seas, the green of the olive orchards and the gold of the sky. The reception structure was set in the olive orchard amongst the ancient trees. We built a custom structure to hang more than 50 meters of thick garland and three beautiful Italian chandeliers. This collaboration was a true meeting of minds that conceptualizes and brings to life authentic visions to create meaningful and unforgettable events, offering services throughout Italy and Europe.


[iframe https://player.vimeo.com/video/383572622 600 338]

Event Design: Joy Proctor Design | Flowers: Bows and Arrows | Gown: Chana Marelus | Cake: MonAnnie Cakes | Shoes: Bella Belle | Hair & Makeup: Alessandro Mancino & Marco Carpentieri | Venue: Masseria Pettolecchia La Residenza | Custom Linens: Allegoria | Digital Photography: Matteo Coltro | Earrings: Twigs & Honey | Film Photography: Gianluca And Mary Adovasio | Paper Goods: Shhh My Darling | Planning & Production: The Wedding Boutique Italy | Rentals: Corso Gaetano | Video: Matteo Castelluccia Videomaker | Welcome Bag: Sea and Grass

These Vendors are members of our Little Black Book.
For membership information, click here
The Only Chocolate Cake Recipe You’ll Ever Need

This cake is mind-blowing. Not looks-good-on-pinterest-but-doesn’t-taste-good-in-your-mouth kind of mind-blowing. The real, honest-to-goodness, your-friends-will-think-you’re-a-star mind-blowing goodness. It’s a dark chocolate cake with a rich, amazing ganache filling that will have you dreaming of throwing in the towel and opening your own bakery called The Perfect Cake. Just you wait.

Dark Chocolate Naked Cake with Ganache Filling

[dotted]

CAKE

We used this chocolate cake recipe (doubled) which makes four 8″ rounds.

Butter / oil for greasing the pans
3 1/2 cups all-purpose flour, plus more for pans **
4 cups sugar
1 1/2 cups good cocoa powder
4 teaspoons baking soda
2 teaspoon baking powder
2 teaspoon kosher salt
2 cup buttermilk, shaken
1 cup vegetable oil
4 extra-large eggs, at room temperature
2 teaspoon pure vanilla extract
2 cup freshly brewed hot coffee

Preheat the oven to 350 degrees F. Butter or grease four 8-inch round cake pans. Line the bottoms with parchment paper, then butter/grease and flour the pans again.

Sift the flour, sugar, cocoa, baking soda, baking powder, and salt into the bowl of an electric mixer fitted with a paddle attachment, blending on low speed until incorporated.

In a separate bowl, combine the buttermilk, oil, eggs, and vanilla. With the mixer on low speed, slowly add the wet ingredients to the dry. With mixer still on low, add the coffee and blend until just combined, scraping the bottom of the bowl with a rubber spatula once or twice.

Divide the batter evenly (I like to measure as I go) into the prepared pans and bake for 35 to 40 minutes, until a cake tester comes out clean. Cool in the pans for 30 minutes, then turn them out onto a cooling rack and cool completely.

GANACHE

We used this ganache recipe (doubled)

4 oz. (8 Tbs.) unsalted butter
2 lb. semisweet chocolate (55% to 65% cacao), chopped (6 cups)
1 1/2 tsp. kosher salt
4 cups heavy cream

In a medium saucepan, cook the butter over medium heat, swirling every few seconds, until melted and the milk solids at the bottom of the pan turn dark brown, about 5 minutes. Immediately scrape the browned butter and milk solids into a medium metal bowl. Add the chocolate and the sale.

Bring the cream to a boil in the same pot over medium heat, and then pour over the chocolate and butter. Let stand 2 minutes, and then whisk until smooth. Cool at room temperature, stirring every 15 minutes, until thickened and spreadable, about 1 hour.

* Note – You will end up with extra ganache which is another total bonus…you can use the ganache to make homemade filled chocolates!

TO CONSTRUCT

1. Cut the tops of each cake with a serrated knife to ensure that they are all level.

2. Place a dab of frosting on an 8″ cake round and add your first layer.

3. Scoop 2 ice cream scoops full of ganache and use an offset spatula to push your chocolate just past the edges. You want to keep your layer of ganache as even as possible. Add more or less to your liking.

4. Add your next layer and repeat with the ganache.

5. Add your final level and repeat.

6. Using a bench scraper at a 90 degree angle while turning your cake as you go, scrape the excess frosting around the cake.

7. Once your cake looks fairly smooth, use your offset spatula to add a bit more frosting to the “in between” layers. It’s okay if it’s messy.

8. Use your offset spatula to again, pull the excess frosting until nice and smooth (and a bit messy looking!)

[dotted]

NEED MORE CAKE INSPO? ANOTHER FAVORITE DOWN BELOW!

DIY Watercolor Cake

[dotted]

Photography: White Loft Studio | Design And Styling: Style Me Pretty Living

A Romantic Wedding at the Oldest Hotel in Italy Complete with Thousands of Mauve Roses

It doesn’t matter how many times we run into a wedding at Italy’s oldest hotel, La Badia di Orvieto, that regal tower and unforgettable stone archway never cease to take our breath away. It’s the most perfect setting for a timeless, elegant affair. Pair that with an abundance of mauve and blush blooms from Janna Brown Design Co. and there you have it – the Italian countryside wedding of our dreams! Check out the full gallery captured by Katie Grant Photography to see why we’re so obsessed with this day, planned to perfection by CheChic!Weddings.

From CheChic!WeddingsSarah and Tom chose to have their stunning wedding at La Badia di Orvieto. “we must say, this may be one of the most beautiful venue we have ever seen” she said. “We never saw it, we arrived there the day before the wedding: our planner Alessandra made everything possible with us just staying at home in Australia” the couple said. “Planning a destination wedding had never been so easy”. 

The ancient walls around the property are all about history and art. Located amongst endless vineyards and olive trees , it set the perfect romantic tone for this wedding. Not to mention the incredible golden hour light the Italian summer blessed them with. Just wait until you see their couple’s portraits. Stunning.

From a dramatic ceremony arch composed by thousands of pale pink and mauve roses (“this is one of the best arch I’ve ever created” Janna said), to emotional speeches, followed by an amazing dinner reception under the stars into a party to end things off, this wedding was a pleasure to take part in. 

Inspired by the amazing surroundings we designed a beautiful tabletop here facing the magical backdrop putting together modern and traditional elements for the romantic set in our mind The table design we kept simple with a focus on the pretty flowers and the natural texture of the soft silk: The table was dressed with a floor length silk runner, warm blush-toned floral to go along with this romantic theme, ivory candles, lots of fruits to complete the décor and a modern calligraphy stationery set completed the table top.

“It was the best day ever!” Sarah said.

Our favorite area of the location is the crumbling gothic stone archway over looking the city or Orvieto, where the dinner took place, If ever there were a place that will make you stop & stare, this is the view. The ceremony location was something unusual to see and a great pleasure to built. “The symmetry between the chairs was perfect, we spent hours on it” Alessandra from Chechic! Weddings said.

[iframe http://player.vimeo.com/video/376100272 600 338]

Photography: Katie Grant Photography | Wedding Planner: CheChic!Weddings | DJ: Pink Panther DJ | Celebrant: TUSCANPLEDGES | Bridal Dress Instagram: Miss Hayley Paige | Bridal dress: Hayley Paige | Celebrant Instagram: Jo Bertolino | Ceremony and Reception: La Badia Orvieto | Florist Instagram: Janna Brown | Flower designer: Janna Brown Design Co. | Graphic 2: Bee In Love | Graphic 2 Instagram: Bee In Love | Graphic design : Laura Stanbury | Lights : Central House | Muah Instagram: Ginelle Dale | Photography Instragram: Katie Grant | Venue's Instagram: La Badia di Orvieto | Video: Dear Vincent | Video : Whitel Ane | Video Instagarm : White Lane | Video Instagram: Dear Vincent | Video Instgarm : White Lane | Wedding Planner Instagram: Chechic!Weddings | lights Instagram : central house | muah : Ginelle Dale

These Vendors are members of our Little Black Book.
For membership information, click here
Go-to Paint Colors for Pretty Blushing Walls

It’s official, after Pantone released their Rose Quartz Color of the Year, blush colored walls became more than just a nursery color of choice. From offices, to living rooms, and yes nurseries too, this color is trending like wild fire and we’re so on board. Click through some of our favorite spaces sporting the pink wall trend and their get the look paint matches

Go-to Pink Paint Colors
View Slideshow
Go-to Pink Paint Colors
View Slideshow

[dotted]

Speaking of Color, Get Inspired with these…

[dotted]

The Best White Paint Ever | 12 Pink Chairs that Steal the Show | The Prettiest Pink Bedrooms

[dotted]

This Light And Airy Desert Wedding Will Make You Think It’s A Mirage

We’re heading to the desert for this destination wedding that’s so good you’ll think you’re dreaming. Meg and Justin decided on Palm Desert for their special day, a locale the bride frequented with her family as a child. They transformed their desert venue into a dreamy oasis filled with a white, green, and dove gray color palette that will take your breath away. The event was beautifully shot by Brandon Kidd Photography. You might need to pinch yourself once you see all the special touches in the full gallery.


From the bride… I grew up going to BIGHORN in Palm Desert with my family so it already held a special place in my heart, and Justin is an avid golfer so getting married on the fairway of a golf course was a dream–– it was the perfect fit.


We went for a refined, elegant aesthetic in each element of our formal wedding. From our attire to the invitation suite, floral design and more, it was important to us that all details were timeless.


We chose dove gray and white as our color palette to create a cool, airy aesthetic to complement the modern design of our venue and stand out against the warm desert backdrop.


There’s a reason people say it’s the best day of your life–– we could relive this day over and over again! All of the effort and time that went into planning was so worthwhile when we had the opportunity to share this celebration with the people we love the most.


Photographer: Brandon Kidd Photography | Cinematography: Bydesign Films | Event Planning: COJ Events | Floral Design: Lotus Garden Center | Invitations: Swell Press | Bride's Shoes: Alexandre Birman | Jewelry: Gordon James Fine Diamonds | Bridesmaids' Dresses: Jenny Yoo | Hair & Makeup: Chelsea Dorris | Calligraphy: Letter Lane Design Studio | Lighting: Perfect Touch | Entertainment: Ben Mallare Events & Entertainment | Groom's Attire: Giorgio Armani | Groomsmen's Attire: The Black Tux | Transportation: Cardiff Transportation | Wedding Venue: BIGHORN Golf Club | Accomodations: La Quinta Resort & Club | Bride's Dress: Carolina Herrera | Bride's Veil: Carolina Herrera | Dessert: Exquisite Desserts | Rentals: Signature Party Rentals

These Vendors are members of our Little Black Book.
For membership information, click here
Crazy Beautiful Interiors in Every Shade of Pink

Pink may be what little girl dreams are made of but Alyssa Rosenheck is here to show you that a pop of blush (or fuschia or bubblegum or rose or oh my…) is a gorgeous addition to any room, at any age. Check out our gallery of crazy beautiful interiors that aren’t afraid to let their pink hues fly. And if you’re as obsessed with those pink velvet sofas as we are, you can take the full tour right here. It’s a good one!

Pretty in Pink Interiors
View Slideshow
Pretty in Pink Interiors
View Slideshow

Alyssa Rosenheck is a nationally recognized Architectural and Interior Design photographer known for her crisp imagery and stylistic eye. Alyssa travels from coast to coast and is sharing some of her favorite soft pink hues from around the country to kick off this Valentine’s Day. Long before Valentine’s Day was all red roses and pink hearts, there were scholars and writers worldwide who waxed poetic words about their undying love. For me, the thought of going back to basics is as romantic as it gets. Figuratively, and quite literally, love used to be a lot more black and white (ink and paper) than these days of Hallmark cards, chocolate kisses, and chromatic bouquets. I’m all for grand gestures, but more often than not, I prefer the simple things in life and letting the walls do all the talking in my world as an interior photographer and stylist.

Whether you’re celebrating this holiday of all things love with your one and only or your trusty group of fabulous gal pals, here’s a way to infuse a little bit of sugar-free sweetness to the day. Each of these gorgeous sherbet-hued rooms—from a marbled wallpaper in a subtly gilded historic Tennessee bathroom to a pair of perfectly peach velvet sofas in a California living room—feature a sweet, and pared-down, nod to the color of love. These sophisticated shades prove the old adage is true, sometimes less is more and simplicity is love.

Photography: Alyssa Rosenheck Photography | Alyssa Rosenheck's Profile Image: Jane Kim | Brass Laundry Room : Lori Paranjape | Living Room with Paired Blush Couches: Amanda Barnes Interiors | Pink + White Hermes Office: Laura Burleson Interiors | Pink BunkBedroom : A Beautiful Mess | Pink Ceiling Master Bedroom: A Beautiful Mess | Pink Entry Door : A Beautiful Mess | Pink Floral Dining Room : A Beautiful Mess | Pink Light Fixture Kitchen : Laura Burleson Interiors | Pink Marbled Powder Room : Sarah Hill Interiors | Pink Oushak Bathroom : Amanda Barnes Interiors | Pink Planter: A Beautiful Mess | Pink Sunset Painting : Ed Nash | Pink Velvet Drape Bathroom: A Beautiful Mess | Pink and Blue Figure Painting : Teil Duncan | Sink Filled with Roses: Amanda Barnes Interiors | Soft Pink Book Shelves: Sarah Hill Interiors | Sophisticated Boutique : Taylor Anne Interiors | Traditional Kitchen: Sarah Hill Interiors | Traditional Master Bedroom: Katie Gibson Interiors

Breakfast Nook Roundup

The breakfast nook was seemingly a thing of the past, but recently we’ve seen such an inspiring array of cozy nooks that we rounded them all up in hopes that you, too, will carry on this time-honored space in your home. So grab a cup of your own coffee, cuddle up and take in all the cozy vibes from these examples.

1. Farmhouse Chic

This is a quintessential example of turning a potentially awkward space into a cozy corner. And this tile…. This tile is just straight dreamy.

from: Bedrosians Tile and Stone

2. Elegant with a killer view

Can you even imagine waking up to a view like this? Sipping some coffee and eating toast and jam while looking over the countryside is the NORM. Yeah, us either, but we dream about it. And just look at that lantern. That is all.

from: Grant Trick

3. Moody Chic with Bistro Chairs

We love when people go bold with their paint colors. This nook is so enhanced but choosing such a moody blue, and the delicate bistro chairs take us straight to Paris. (please read Paris as “par-ee”)

from: Heidi Caillier Design 

4. Architecture for the win

There’s a very, very fine line where architecture and design are interchangeable words, but this breakfast nook is a great example of it! Just look at that frame! And the windows! It’s a work of art.

from: Jeffrey Dungan

5. Pink and Plushy

This breakfast nook has a PINK bench. PINK. And look at how inviting it is! And so soft! We’d never leave.

from: Joe Fletcher Photo

6. Bright White with Lot’s of Light

This corner is everything you could ask for in a breakfast nook. It’s light, bright, has a HUGE bench and fabulous chairs with natural texture. And again with the lantern.

from: Julia Engel 

7. Golden Glow

It would appear that this breakfast nook is so perfectly located that it gets to participate in Golden Hour. Bravo is all we have to say about that. Bravo.

by: Kate Mark Interiors

8. Blue Velvet

The blending of styles that happens in this corner is one of our favorite elements about it. The art coupled with the chic blue velvet bench makes this one-of-a-kind set up so just friggin chic.

by: Shazalynn Calvin Winfrey 

9. Wallpapered and fabulous

Another great place to bring in bold wallpaper is the Breakfast Nook, ESPECIALLY when it’s so set apart like this one is.

by: Brooke and Lou

If you were particularly inspired by this round of inspiration, stay tuned for a 101 to create your own breakfast nook!

These Vendors are members of our Little Black Book.
For membership information, click here
Step Aside Neutrals This Bright And Bold Styled Shoot Will Make You Swoon

A neutral color palette seems to go hand-in-hand with an elegant estate wedding. That is until Events Held Dear and Nicole Clarey Photography teamed up to break the mold! They created a styled inspiration shoot filled with bright bursts of color that only add to the grandeur of the day. A pink gown, vibrant centerpieces, and an intricately designed floral cake prove that fun color pops can be incredibly chic. See all of the vividly designed day in the full gallery.


From Events Held DearWhile we love crisp whites and ivories and minimalistic design, we’re also color-lovers at heart and were wildly excited to bring some color into this estate in Northern Ohio.


We staged a small ceremony in the garden, had flower petals thrown as the couple was ‘married’, and Roots Floral Design took her floral concept to the ground – an installation we loved and would love to see brides do more of!


For the tablescape, we were ready to go with big color for the linen, so we settled on a velvet blue linen. It was the perfect shade and tied really well with all the pinks, creams, mauves and purples proving that color can be elegant!


[iframe https://player.vimeo.com/video/383419820 600 338]

Photography: Nicole Clarey Photography | Cinematography: Anna Lord Studio | Event Planning and Design: Leda Anderson Events | Floral Design: Roots Floral Design | Wedding Dress: La Jeune Mariee Bridal Boutique | Wedding Dress: Monique Lhuillier | Cake: Miam Cake | Invitations: Victoria Fiaretti | Shoes: Bella Belle | Ring: Erstwhile Jewelry | Make Up: angie warren artistry | Tuxedo: Generation Tux | Vintage Car: Classic Limousines Of Columbus | Wedding Venue: Kingwood Center | Linen: BBJ La Tavola | Models: Lola Laymon | Rentals: Event Source | Ring Box: The Mrs Box | Wedding Veil: Toni Federici

Dark Chocolate Cookie Shots Because Duh.

This chocolate lover was nothing but a million heart eye emojies for these dark chocolate cookie shots. If you think they look delicious, trust that they taste even better. The perfect little one stop shop for a Valentine’s dessert and even better when part of a whole delicious spread. Because the only thing better than chocolate is chocolate upon chocolate upon chocolate with a little sip of milk. YUM!

From Abby… I tried two different recipes. A roll out chocolate sugar cookie (the idea is that they don’t want to spread so this seemed perfect). AND a pre-made gluten free, chocolate fudge cookie from wholefoods. Both worked so-so but the one that seemed to have a slight edge? The pre-made gluten free variety!

[dotted]

Dark Chocolate Cookie Shots – Two Approaches

[dotted]

PopOver Pan

PopSugar has a great video using a pop-over pan!

Silicone Mold

We used this silicone mold!

1. Once you have your dough, you want to gradually fill your mold. Don’t overfill or stuff down but make sure that your mold is completely covered with no holes in the dough.

2. Bake about 5-10 minutes past the instruction time. We baked our first from-scratch recipe by about 8 extra minutes. Our gluten free variety needed about 10 extra minutes. You can gently touch the top to feel if they have set up

3. Allow to cool completely, then gently remove.

4. Once you have your cookie shots out and cooled, melt about 6-8 ounces of chocolate chips in a microwave safe bowl (you might need more if you are making more than 10. Pour a small amount of chocolate into the bottom of each cookie, then turn your cookie allowing the chocolate to bleed up the sides as high as you can. Pour any excess chocolate out into a separate bowl. This will ensure that your milk has a sealed area to get cozy in.

5. Now, rim it. We used crushed toffee but anything goes here. Brown sugar, sprinkles, crushed dark chocolate, anything! You’ll want to dip your cookie shot into the melted chocolate first, then into your topping.

6. Finish with ICE cold milk (don’t skimp here with the cold factor) and pop a pretty straw 3’s and they were the perfect size.

[dotted]

Photography: White Loft Studio | Design And Styling: Style Me Pretty Living

This NYC Couple Had The Most Epic Colorado Ranch Wedding

The beauty of Colorado meets NYC cool for a wedding that will leave you speechless. For their Big Day, Hannah and Will decided on Oak Creek, Colorado. They feel in love with its panoramic mountain views and the fact that it was a special place the bride visited with her family as a child. Together with Heather Dwight of Calluna Events, the couple brought an elevated vision out west. The destination weekend was beautifully photographed by Ashley Sawtelle. Visit the full gallery for a closer look at all the special details.


From Calluna EventsWe wanted to keep in mind the palette and textures of our surroundings to respect the landscape. I loved the idea of mixing fabrics and silhouettes in a champagne color to create really soft texture that would stand out against the backdrop.


The ranch provided a vintage forest green truck, which served as a large floral display and the perfect backdrop for guests’ portraits during cocktail hour. Other personalized details included a custom horseshoe escort card display to help guests find their seats.


The tent was designed with hanging greens, organic florals and grasses by Lalé Floral. Dinner was catered by award-winning Chef Hosea Rosenberg’s catering group, Blackbelly.


Guests were entertained with a live band and a disco ball that brought a little bit of the couple’s city life to the ranch. It was a weekend filled with wonder that no one will soon forget.


Photography: Ashley Sawtelle | Wedding Planner: Calluna Events | Floral Design: Lale Floral | Wedding Dress: Mira Zwillinger | Ceremony Venue: https://www.lucky8ranchco.com | Reception Venue: https://www.lucky8ranchco.com | Catering: Blackbelly Catering | Makeup: Jessica Shinyeda | Hair Stylist: Andres Mendoza | Entertainment: Midnight Social | Decor: Eclectic Hive | Lighting Design: Eclectic Hive | Rentals: Colorado Party Rentals

These Vendors are members of our Little Black Book.
For membership information, click here
NY Chic Meets Carolina Charm At This Montage Palmetto Bluff Wedding

We have to admit, we love a green and white color palette. The combination is timeless and always gives us the crisp, clean vibes we crave. Need proof? Just take one look at Nicholas and Mariana’s wedding. The couple exchanged vows at Montage Palmetto Bluff, in South Carolina, amidst a sea of lush white blooms and organic greenery. The elegance and romance of the day was beautifully captured by Simply Sarah Photography. See all the pin-worthy details in the full gallery.


From the bride… Montage Palmetto Bluff has long been my family’s happy place. We’ve been traveling there for many years and, despite being born and raised in NY, there is something about the low country that feels like home. I knew immediately that this was the place for us to host our destination wedding weekend!


The venue is beautiful on its own so, for us, it was all about accentuating the amazing backdrop with an organic, clean, and elevated aesthetic. We mixed lush white blooms with greenery and moss accents throughout each space of the wedding.


At the tented dinner reception, we wanted to make the head table feel special so we found these amazing basket lanterns, inspired by a trip to Tulum, to create a dramatic installation above the center farm table.


We also incorporated tons of candlelight on the tables and scattered along the ruins surrounding the dinner tent which provided this magical glow at sunset. I couldn’t have wished for anything more – it was so magical and fun!


Photography: Elizabeth Lanier Photography | Event Planning: Bellafare | Floral Design: Katelyn Pinner Studio | Wedding Dress: Mira Zwillinger | Invitations: Bespoke Designs | Hair and Makeup: Meg Workman | Lighting: Technical Event Company | Groom's Attire : Ralph Lauren Black Label | Ceremony Music: Palmetto Strings | Ceremony Music : Palmetto Strings | Transportation: Lowcountry Valet | Wedding Venue: Montage Palmetto Bluff | Linens: Mayker Creative | Linens: BBJ La Tavola | MOH Dress: Erdem | Processing and Development: PhotoVision Prints | Reception Music: Elan Artists | Rentals: Ooh! EventHaus | Rentals: 12th Table | Save the Dates: Studio R | Tenting: Skyline Tent Company

These Vendors are members of our Little Black Book.
For membership information, click here
Delicate White Roses Inspired This Fairytale Wedding in the French Riviera

When you see this drop-dead-gorgeous wedding in the French Riviera, you would never believe it was planned in just 3 short months – all thanks to the dream team that is White Eden Weddings. A wow-worthy courtyard reception, textured table lines, a romantic chateau, emerald hues at every turn and floral arrangements galore from SB Floral Design… these are just a few things you can expect to see from today’s dreamy wedding captured by Oliver Fly Photography. Head on over to the full gallery for some major destination wedding inspo!

From Oliver Fly PhotographyWhen Yulia and Filip began planning their destination wedding set just outside of Cannes, they drew inspiration from a personal place—Yulia’s love of white roses, to be exact. With that notion in mind, delicate white florals became the guiding design principle, from the stunning applique of Yulia’s gown to the three-tier wedding cake to the textured table linens, and of course, the extravagant floral design featured throughout the day. 

While the couple currently calls New York City home, Yulia and Filip dreamed of an unforgettable celebration set abroad. They chose to invite guests from Russia, Macedonia, and across the world to join them at the renowned Château de la Napoule in the French Riviera. Their wedding have been planned and designed in less than 3 months by the talented planners Mylène & Geoffrey from White Eden Weddings which is a great achievement when we see the fantastic results. 

To begin the design process, the couple selected custom stationery featuring a hand-drawn sketch of the château, with neutral tones and touches of emerald green as a nod to their color palette. They envisioned a distinctly French wedding style with a refined yet warm atmosphere, and White Eden Weddings guided the entire process to ensure it was the celebration of a lifetime. 

The scenery surrounding the château and its ceremony aisle was incredibly majestic. The goal was simply to enhance the look without distracting from its natural beauty. Lush white florals—including Yulia’s favorite white roses—were placed at the ceremony entrance and along the aisle. There was also a 13-foot high panel of greenery designed to blend with the château battlements that worked to hide the dinner courtyard for the evening reveal. 

Throughout the day, guests enjoyed incredible music, including a string quartet during the ceremony, a jazz threesome for the cocktail hour by the sea, a strolling band during the reception, and a DJ for the after-dinner party—all of which perfectly set the tone for every phase of the event. Along with music, Yulia and Filip treated their guests to a curated selection of drinks, with mixologists serving five signature cocktails.

The reception featured equally stunning moments with vintage gold chandeliers, greenery installations, custom menus with the château sketch, and an acrylic panel seating chart—each designed to complement the event’s signature white, green and gold color palette. Tableware was kept elegant yet discreet, with selections made of glass and gold trim. As the showcase of the reception, Yulia and Filip’s wedding cake was decorated with white roses as a nod to Yulia’s incredible wedding gown. While this white rose-inspired wedding was nothing short of a modern-day fairytale, no detail came close to outshining Yulia and Filip’s love for one another, as beautifully captured by a great explosive duo the photographer Oliver Fly from Paris and the videographer Aaron Novak from California.

[iframe http://player.vimeo.com/video/354260008 600 338]

Photographer: Oliver Fly Photography | Videographer : Aaron Novak Films | Wedding Planner: White Eden Weddings | Floral Design: SB Floral Design | Cake: Made In Cake | Caterer: Pavillon Traiteur | DJ: Thomas Dusseune | Chateau: Chateau De La Napoule | Cocktail Bar: D.N.A Bartending | Dress 1: Grace Loves Lace | Dress 2: BHLDN | Hair & Make Up: Olga Vashchuk | Jazz Band: Lizzy & The Gentlemen | Linens: Nuage Designs | Rentals: Deco Flamme | Rentals: Options | Stationery / Calligraphy: Silent Word Studio | Strings: Incanto Musique | Strolling Band: Johnny and the Walkers | Technics & Lights: D&X Events

Ask The Editor: Bold Cabinets, Birthday Parties, Spontaneous Entertaining Preparations, #Beigeprison, And More!


Welcome to our first edition of Ask The Editor!

Last Sunday we opened up our digital mailbox for write-ins, requests and advice opportunities — and you guys rose to the occasion! It was hard to narrow down which questions to dive into, so at the bottom of this article, you’ll notice we’re going to take some of the questions and make full-on articles with them. Stay tuned with our Home 101 series, some of your questions just might show up there!

So here it goes!

From @jennaecurran: “Simple two year old boy birthday party”

We LOVE a good birthday party. At such a young age, a birthday party is not only a celebration of a milestone for your little one, but it’s also an opportunity to celebrate the village it takes to raise him! We’re talking grandparents, aunts and uncles, neighbors… the whole gambit.

So with that in mind, you can really have fun with the birthday party and expand your horizons to include nuggets of entertainment for the adults as well. Here are a couple of ideas!

1. A characteristic thing from their second year: Did your kid show particular excitement over something random this year? Is he ALL about bears? Or trains? This birthday party can be a celebration of what your son is passionate about in this season of his life! It will make him so excited to see his favorite things all around on his special day, and it’s a great way to document his passions in this stage when you look back on the photos and remember “gosh that kid was a Ross Geller in training, he couldn’t get enough dinosaurs!”

2. Two is a particularly fun year for birthdays because there are a lot of pun options:

– Two The Moon, space party
– Two-Two (your kid) is Two! train party
– Twotally Awesome
– Mr. Tworrific
– Two infinity and beyond, Toy Story party
– Two legit to quit
– Taco Twosday, crowd-pleaser for everybody, honestly
– “Oh-Twoodles,” Mickey Mouse Party

There are a lot of fun options for this age! We want to see what you end up doing, so share your image and use #smpparties so we can see how it goes!

From @rschapiro: “How to choose a vibrant kitchen cabinet color with an open living concept”

The key here is balance and a touch of unity! When you go big and bold with cabinet colors, balance it out by making your base furniture neutral in your living room. Choosing a neutral colored couch and set of accent chairs helps add that balance, but then add in some color coordination with throw pillows that compliment your kitchen color!

So for example, if you’re going cobalt blue with your kitchen, opt for cream or grey furniture and then top them off with throw pillows that have cobalt blue florals as part of their design! It’s aaaalll about balance.

From: Annonymous (in case their nieces and nephews are following along as well :) “When to stop buying presents for your niece and nephew”

It’s appropriate to acknowledge gift-giving situations (holidays, graduations, birthdays) in some manner. So if it’s not presents, opt for a letter! But the transition from presents to a letter really depends heavily on the type of relationship you have with your niece and nephew.

Here’s a good rule of thumb: if you have the kind of relationship where you can intuitively think of a good present — anything from a sweater you walked by that you know they’ll like, to a Starbucks gift card because you know they like their daily sugar-free vanilla latte with an extra shot of espresso — then it’s still appropriate for you to get them this gift.

If you’re scrambling to find SOMETHING that they might like without much knowledge of what they’re “into” these days, it’s an appropriate time to move on to a nice letter. But when in doubt, a nice gift card is always appreciated.

From @shamani_d: “How to approach an attic conversion”

This is going to be fun! An attic conversion means adding workable square footage to your home and that’s always a win.

To start off, take inventory of what you ~wish~ you had room for in your current square footage. Do you find yourself wanting room for a guestroom? A playroom for your kids? A workout room?

As your working through that wish list, take note of what kind of space your working with! If you’re working with a pitched roof, that provides some obvious limitations, but a cozy office is enhanced by natural features like that.

Finally, bring in the professionals to find out what you actually can do in your attic. If you can’t bring water up without it costing an arm and a leg, a guest bath might not be possible. Start with identifying what you want, then find out what’s possible. Once those decisions are discovered, the rest starts to become clearer.

From @melanieelefante: “How you maintain order and organize a home”

This question could not only be its own post, but its own series! Keeping your home organized is a balancing act everyone struggles to maintain, but there are a few common denominators that those who have a neat home tend to inherently follow:

1. Perpetual tidying: We wish we could tell you there’s a quick fix, but ultimately the quickest of fixes is building good habits of general “tidying.” Picking up this habit can look like making a lap around the house before bed, gathering bits and bobbles at the foot of the stairs every morning or an “all hands on deck” post-dinner dish round-up. Maintaining order is an ongoing process.

2. A place for everything and everything in its place: There’s a rule of thumb tidy and organized people tend to follow and it’s to not put something down where it doesn’t belong. For example, if you use scissors, once you’re done using them don’t set them down where you just completed your project, take the extra steps to return them to the drawer in which you got them. This sounds like a no-brainer, but you’d be surprised at how quickly this habit can change the state of your home!

3. Pretty Organization: Stay tuned, we have a whole baskets feature coming. We’ve said this before and we’ll say it again, but a confined mess is a WHOLE lot easier to tackle then spread out mess. If you utilize baskets well, it gives those “random” items a pretty holding place while you attend to other matters, and when you’re ready you can address the basket. But, in the meantime, at least it looks good :)

Again, this could be a whole series on its own, but these three steps should help get you started!

From @quewendy: “How do you decorate/style above the kitchen cabinets? Is that even a thing anymore?”

It is a thing! Many of the homes that were built in the previous decade contain a gap from the top of the cabinets to the ceiling, and that big empty space is just begging for some attention!

If you’ve got the budget for it, the biggest and most impactful thing you can do is turn that gap into extra storage by framing it out and adding doors. But, that is a heavy, long-term investment.

If you’re looking for a quick-fix, you can fill the space like you would any open shelf. Pepper in things like serving bowls, basket storage, a little bit of greenery or wood cutting boards. Adding these items in that above-cabinet gap will feel a lot more filled out and intentional.

At the end of the day, you can always benefit from extra storage so adding some natural weave baskets is a great practical, and decorative, option! Just remember that most things above the cabinets will be “out of sight out of mind,” so choose only the items that aren’t used frequently.

From @katewalthall: “How to stock a house for spontaneous entertaining since spring and summer are coming”

Another great question that could be its own series! But, to summarize, here are just a few tips and tricks to help out — keeping a candle, cookies and a good beverage on stock is a geat place to start.

1. Have an emergency “smells really good” candle: It’s ok to splurge on this candle a little bit because it’s going to work hard to help with your home’s first impression! Keep it on the entry table and only light it when people are headed your direction. Make sure it’s a light, crisp scent and it will be a preeeettty handy little tool to have in your back pocket for those spontaneous drop-ins.

2. Freeze some cookie dough now: Do yourself a favor and make a batch of cookies, scoop them into their “pop on the tray” state and put them in the freezer! Take a cue from Monica and work to find the ~best cookie recipe ever~ to have on hand, in the freezer, ready for when guests pop by. With them already pre-made like that, you can have warm, goey, freshly made cookies in about 10 minutes, and there’s no warmer welcome than that!

3. Determine a beverage to always have on hand: One of the most adorable, key characteristics in the south is their affinity for sweet tea. Popping in to someone’s home is almost always met with a sweet tea offering (well, according to Reese Witherspoon) and the token of the offering is a major gesture of hospitality. Take notes from this and refine it to reflect your own home! Do you want to always have coffee on hand? Maybe you want to offer a lovely camomille? Maybe a sweet + sour lemonade is just the ticket! The idea is to make sure that you have something to offer your guests and being prepared on the front end helps a ton!

For more tips on how to make your home guest-ready quick, read this article!

From @katiemelesurgo: “How can I make a room light and bright without many windows?”

The most useful answer on this topic is this — reflective surfaces! Mirrors are magic when it comes to extending just a little bit of natural light, but the same effect can result when using picture frames with a glass layer. The key is to strategically use the small amount of light that you do have, and help it bounce around.

Also, take care in what fabrics you use. Heavy fabrics, especially in low-lit places, can take up all of the light you do have and make it all but disappear. Using lighter fabrics in both color and make (think sheer curtains) can help extend your light!

Lastly, be careful with cream! Low-light situations can take something that, in natural light, looks completely white, crisp and clean and turn it into a putrid yellow that you didn’t know existed. Sticking with lighter colored blues helps a lot. Even going so far as choosing your light-bulb color can completely shift the appearance — pick the bluer hue of lightbulb!

From @katharinepfeiffer: “How do I bring in traditional pieces to a very modern and new home”

Firstly, congrats on the new home! Bringing in traditional items can seem really daunting, but you can use it to your favor! A lot of modern and new build homes have a tendency to come across as stark and actually NEED some older pieces, so you’re in luck!

Again, the key here is balance. If you’re working with an old armoire, consider adding a sleek vase full of textural stems on top to modernize it a little bit. If you’re working with traditional side tables, add a more modern lamp on top!

The best designs are composed of a balanced blending of styles, so you’re off to a good start! Coordinating elements and intentionality will bring it all together.

From @tiffany2979: “How to style a rental apartment you can’t paint and you don’t own the furniture? #beigeprison”

This is a tricky one! First, let’s talk about why your landlord #wentbeige, understanding that will help liberate you to take your apartment into your own hands. The thing with beige is that it’s considered a neutral, it hides stains fairly well and it’s a mass-produced color so coordinating with it is, supposedly, doable.

So, with this in mind use it as a launching pad to GO BOLD. We’re talking cobalt blues! Deep, velvety purples! Millennial pink! If you can’t change the color of the walls or furniture, add some jewelry to your space. This can be in the form of throw pillows, rugs, curtains, bedding, throw blankets, vases, picture frames, kitchenware, knick-knacks and figurines.

Obviously this can be a heavy investment, so start with the biggest impact first — textiles. Adding some color to your textiles can completely transform the space. Once your color palette is set there, then pepper in the other items.

A word of caution — avoid trying to make this apartment white. For whatever reason, when you take beige and try to clean it up with white, everything looks yellow. Best bet is to use this time to experimentally go big and bold with color, and have fun with it!

Here’s an article on 5 inexpensive ways to customize your rental for more information!

STAY TUNED FOR

@Meganblowmqvust — a “how to style your coffee table” Home 101 article is coming soon!

@mwagansmooney — next week our Home 101 is all about how to style bookshelves, and we’re not going to lie to you we’re pretty jazzed about this article.

We thought we’d answer about 5 or less questions in this blog, but as they kept rolling in we couldn’t narrow down that far! So, obviously we expanded…and we also saved a few questions from this week to add to next week’s lineup :)  so if yours wasn’t answered this week it might be answered next Friday!

Thank you all for participating, and we’ll be back next week with more questions and answers!

The Full Style Me Pretty Collection Is Here and It’s Pretty (Of Course!)

We love our jobs, really, we do – because day in and day out we get to bear witness to some of the most incredibly gorgeous weddings. From al fresco ceremonies to tented cocktail hours, romantic courtyard receptions to crave-inducing after-parties, it’s all beautiful, but it’s even better because we get to know the couples who dream these fetes up and find out how their details come together. For Abby, though, the details are just the beginning.

“They say “details are everything,” I say details are just the pretty on top of an even more beautiful love story. The Style Me Pretty collection is about you and the one you adore. It’s charm and style, wit and whimsy. It’s decidedly modern and yet forever rooted in tradition. It’s love, styled so very pretty.” #Preach.

That’s right, ladies, if you’ve been loving our Style Me Pretty collection at Michaels, you can keep falling head over heels as we have even more heaven-sent wedding must-haves for you, now available to shop the full collection exclusively on the SMP website!

No matter which part of your special day you’d like to deck out, we promise we’ve got the details locked and loaded. Read on for 10 of our most loved looks, available online right now!

1. Neon Pink ‘Love’ Sign.

Okay, so not saying you need to do some pre-engagement shopping, but if you have even the slightest inkling that a sparkler for THAT finger is on its way, you might want to start planning out that selfie… #wereengaged #finally #loveisloveislove. Can you see it now? Snap a pic under this neon LED tube light sign ((don’t worry, there are built-in loops for easy hanging!)) and Gram it ASAP. Oh! And don’t forget to repurpose it for your engagement party, bridal shower, and bridal suite the morning of your wedding.

2. Chair Signs Mr. & Mrs. Tassels

Is it ever too early to start getting used to your new titles as Mr. & Mrs.? Nope! In fact, soon enough you’ll be sliding up all nice and cozy next to each other at your sweetheart table, so why not start with something at home? These classic linen signs with tassels and gold accents lend a striking design to your at-home normal, so much so that every night can feel like celebration.

3. Gold Love Metal Hoop Decor

Speaking of celebrations, how about that engagement party? Our gold love hoop is a great photo backdrop that can be premiered at the e-party and then recycled for your bridal shower, rehearsal dinner, and cocktail hour. Cute idea for you: take a pic with your partner under or beside the sign at each of your wedding festivities and then post a carousel of the images with the sign hanging up in your home on the first #throwbackthursday following your wedding!

4. ‘But First Drinks’ Light Up Sign

We’ll stick with the engagement party for now, because where better can you pop some bubbly and toast new beginnings than a soiree in your honor? Give your bar a little ‘lit’ moment with a ‘but first drinks’ sign, and maybe even debut a pair of signature cocktails for the occasion! This can also reappear the morning of your wedding in the bridal suite, because mimosas and bellinis are sure to be flowing…

5. Gold Bubbly Bar Acrylic Sign

And how perfect is a bubbly bar sign for your bridal shower? It’s adorable and ultra festive! Plus, LBH, ladies like to stage their bridal shower pics next to something epic and experiential – THIS IS IT! The Instagram moment of the day. We like to pair ours with rosé champagne or bubbly grapefruit cocktails, but that’s just us!

6. Always You Wood Sign

Whether they care to admit it or not, guests catch feelings on wedding days, and you can help them embrace that “loving feeling” if you’re setting the stage with all the right allusions to affection. It’s wonderful when couples have members of their bridal party greeting guests as they disperse into the ceremony space, but it’s also a sweet touch to display signage with appropriately wedding-worthy sayings or quotes. Something like this “It Was Always You” wood sign is just the right thing to elicit all the “awwwws” from your attending guests.

7. Gold Taper Candles

When we talk about having a warm welcome for guests, we imagine each person strolling into cocktail hour and upon taking a look at all the wooden details mixed with modern acrylic & metallic motifs, and chunky and & tapered candlelight everywhere, feeling at home ((but still far away from theirs, because every guest wants to feel like he or she has escaped reality for a few hours)). We love the delicate, yet inviting look of our tapers displayed on fireplace mantels or shelving spaces throughout the venue – and it’s perfection when greenery or garlands are involved.

8. Gold Cheers Acrylic Sign

Want to continue fizzing up the flirt-factor of your wedding bar? This clink-worthy sign is everything you need, because what do they always say? “No great love story ever started with someone eating a salad?” That’s right, it started with something much less healthy, but a lot more fun!

9. “Our Day” Gold Chair Signs

You can have your own sweetheart table, for sure, but we’re equally here for a sit down amongst your favorite people in the world. Your seats are saved with ‘Our’ and ‘Day’ gold calligraphed signs, so you won’t have to fight anyone for those middle spots – you’ve got ‘em! Pretty sure we’re already daydreaming about what your sweet first kisses are going to look like with this stunning set behind you. Wonderful, too, if Mr. and Mrs. isn’t your style!

10. ‘Party’ Cup Tumbler with Straw

A great wedding ends with a great send off. Once you’ve departed through a sea of sparklers, bid your guests adieu till the after party, and start whoever will be joining the festivities with a refreshing mood cocktail – sans alcohol – in their own cute wedding party tumbler, complete with what else? A sassy tassel!

👇👇👇

Shop the full line on site now, we’re so excited to see some SMP on your BDE (best. day. ever.)

DIY Coffee Table Bench

This bench was actually repurposed from a $60 coffee table! We painted the legs gold, then wrapped a piece of velvet like fabric over a precut piece of foam using nothing more than a staple gun. Boom, done! I am a little in love with this project and feel like of all of our ideas, this one really feels the most luxe, the most high end.

Materials

Ikea coffee table
Gold spray paint
1 yard fabric
1 1/4 yards of 2″ thick, 24″ wide foam sheet
Yardstick
Sharpie
Scissors
Pliers
Staple gun
1/4″ staples

costs and time: $100 per bench (plus some tools from around the house- scissors, pliers, staple gun)
1 1/2 hrs per bench

instructions

step-1 Use pliers to twist off the metal tabs on the bottom of the long table. Pull them straight up and straight down a few times and they should pop right off.

step-2 Spraypaint the frame of the table gold and let dry 1 hour.

step-3 Trace the composite board of the coffee table with the sharpie on the foam sheet. Cut out the foam sheet along the lines with a bread knife.

step-4 Cut the fabric to be 8″ wider and longer than the table base.

step-5 Layer the foam sheet, then fabric, on top of the base. Staple gun the fabric to the underside of the base to secure it. At corners, fold the fabric to make a nice seam and then staple.

step-6 Place the base on the top of the gold frame and your bench is ready to go!

Decor: Ikea | Headboard: One Kings Lane | Photography And Design: SMP Living

You Can Feel The Love At This Winter Wonderland Wedding

This heartfelt winter wedding is bursting with love. Caroline and Poorang changed their wedding plans from sunny California to snow-covered Vermont so that the bride’s mother, who was battling brain cancer, could be by her side on her special day. Caroline wanted nothing more than for her mother to watch her walk down the aisle, and with the help of both LVL Weddings & Events and Blissfully Styled, created a cold-weather wonderland worthy of a fairytale in 10 days. From start to finish the affair was a beautiful celebration of life and love. See all the joyful details in the full gallery.


From LVL Weddings & EventsThis wedding has a special story. When Caroline asked us to plan her wedding in 10 days we made it happen with the help of Hoo Films, Jana Williams, and the Stowe Vermont community. Snow-covered scenery, rich hues, and lots of love made for a truly romantic experience. Tables were covered in white and burgundy blooms and lots of candlelight for a magical reception moment. It was a moving experience for all and a special memory that the couple will forever hold dear in their hearts. We were honored to help Caroline and Poorang plan such a love-filled day.


From the Bride… For my husband and I our wedding day was genuinely our “best day ever!” My love proposed 5 years after we met and for my second (and last) trip to the alter, I wanted a big big wedding and was so excited to plan all the details! But, just a couple days following our engagement, my mom was diagnosed with terminal brain cancer. We set a date for 5 months out, however, her prognosis worsened and we decided to take no chances on her being able to be a part of our day and fully enjoy it. We were already planning to be with family for Christmas and decided we would get married during that trip, in 10 days, 3,000 miles away, in Stowe, VT, a town neither my husband or I had ever been to.

We were encouraged to a simple ceremony merely for my mom to be a witness to the marriage. Friends and family and even my planner said “get married in Stowe and you can have the big party later in the year.” But, I wanted the wedding day itself to be more than a transaction to legalize love; I wanted it to be meaningful, memorable and romantic and it proved to be exactly that.


With only 10 days to plan, we got focused on the most essential things for us: our vows, our rings, a pretty setting, bridal clothes to create a wedding photo to cherish, a bouquet for me and a white cake. Even this short list of important things took a collection of amazing people to make it happen.

My dress (a sample in perfect condition) was altered in less than 24 hours (with 3 fittings); our rings were rushed to be sized and engraved (although not with the date because we weren’t certain what day it would be), my husband bought a wedding suit from Nordstroms and had it altered. Meanwhile, in Stowe, we found a gorgeous venue that was fully booked for dinner but they graciously agreed to open for lunch if we would have an afternoon reception; this created the most romantic backdrop for our happiness complete with candles and a wood burning fire. The menu would be their standard menu with no customizations, and it was divinely good. The iconic Stowe Community church was available for an early afternoon wedding complete with a pipe organ and chimes that rung as we left as newlyweds. The florist had another wedding but agreed to do our florals and deliver them early.


On our wedding morning, I receive the most heartfelt note from my Planner focusing me on being fully present in each moment of the day. This was the best advice. The day was magical! Only our immediate family was present (18 of us in all) and that made it even more special. I proudly walked down the aisle with my mom and dad! My brother-in-law served as best man. My nieces had planned to be maids of honor and on the eve of our wedding day, my nephews said they wanted to be groomsmen and stand beside my husband.

On my wedding day, I experienced the most profound sense of joy I have ever felt! I was marrying the love of my life surrounded by the most important people in our lives, our family. When I think about that day, my heart is overjoyed at how much happiness surrounded us. I think about looking in my love’s eyes as we exchanged our love for each other and vowed to love each other forever, I think about the Pastor who after only meeting us once, delivered a matrimonial service that was so tenderly specific just for us. I think about the photographer and videographer who left their own families on Christmas to be with us and capture the beauty of the day and our family’s last celebration with my mom. I feel my mom and dad’s arms intertwined with mine as I walked down the aisle and I thought how complete this moment was and smiled. I think of every mile traveled by our family to be there on our special day. I think of the snow gently falling from the sky giving the most perfect background through the three walls of windows to our luncheon at a table overflowing with winter white blooms, real candle light and the smell of a wood-burning fire. I remember the beauty of walking into a room for lunch that was glowing and more gorgeous than I ever could have planned – snowing falling, candles lit and wood burning fire in the fire place – gentle harp music in the background and my parent’s cake-topper atop a simply elegant white cake with the must have gold band to match the gold satin on my dress.

On our wedding day our love for each other was exploding out of us! All our expectations were exceeded and it could not have been better if we had unlimited time and resources to plan it! Most of all, the best part of this day is that it happened because of my mom, for my mom and it will be forever entwined with it one of the fondest remembrances of my mom!

[iframe http://player.vimeo.com/video/309321190 600 338]

Photography: Jana Williams Photography | Flowers: Bramble Bloom | Cake: North County Cakes | Makeup : Elizabeth England Studios | Hair : Jessica Murphy Hair | Venue: Edson Hill | Video : Hoo Films | Wedding Planners: LVL Weddings & Events | Wedding Planners: Blissfully Styled Events

These Vendors are members of our Little Black Book.
For membership information, click here
BESbswyBESbswyBESbswyBESbswyBESbswyBESbswyBESbswyBESbswyBESbswyBESbswy